Pages

Thursday, August 19, 2010

Moving Mountains (or small mounds of dirt)

In order to get to the point where we could fill in the pool, we needed to break up the rest of the concrete in the yard and get it in the pool. To help with this task and others, I would like to introduce you to the BX25 Kubota tractor.

We rented this guy for the week to do some of the heavy lifting we needed to do around the house. It made breaking up the cement so much easier.

For a few days it looked like our backyard exploded which was actually an improvement over what it looked like before, but once we broke up the cement into pieces and got it into the pool, the backyard started resembling a backyard.


Then, the real transformer, the fill arrived. I got a big kick out of the fill coming out of the truck so here are a few pics.


This was one of four loads (2 fill and 2 loam) that were delivered throughout the day. Then we started filling in the pool!

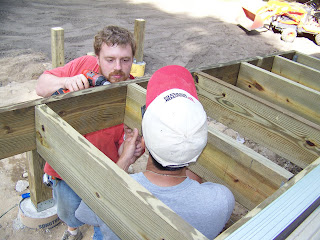
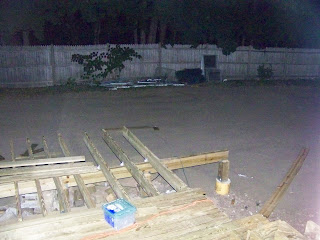
Look how flat! It was a bizarre feeling when we were finally able to walk in the area we once would have fallen into. This is just the fill down (notice all the small rocks) so the nice loam still needed to be spread. Before we started do that though, we used the tractor to dig the footings for the deck. While we continued to spread dirt around we also started building the deck. Nate's mom came down with Tom and my mom also came down to help construct the deck and they did so much work!!

Footings

Base beams

So we stayed at this point for a bit due to a lack of levelness. We tried a bunch of different things to make sure that when we cut the beams to the right height that the deck would be level, but the only thing that worked in the end was a 360 degree laser. Even that was difficult considering it was a bright day but it did the trick and now we are going to have a nice level deck.

Attaching the upper landing

Attaching the joists

Spreading the loam

Joists attached

Spreading more loam

Loam all spread

Stair forms in

This is where the deck currently is at. We are slowly putting down the decking and hopefully will finish the rest of the deck this weekend!

Tuesday, August 10, 2010

The Demise of the Pool - Part II

As seen in   The Demise of the Pool - Part I   the first jack hammer that we got (60 lb electric one) didn't do as good of a job as we would have liked. In an attempt to speed of the process, we decided to pull out the big guns and rent a 90 lb compressed air jack hammer. This one was definitely worth the money. Nate was able to destroy huge chunks of cement in minutes which took hours with the other one. The long wall of the pool was too long for us to take down all at once, so we broke it in half and took it down in pieces. We ran into a few snags along the way. The first was a very minor cut on my hand that resulted in a trip to the ER since I cut it on a rusty nail and haven't had a tetanus shot in 15 years. The second snag was something in the pool. While Nate was jack hammering the stairs out of the pool he came across this:
If you can't tell from the picture, that is a large bone. This bone was so large we didn't know what (or who) it might belong to. This resulted in a call to the police (yes we watch to many episodes of Bones) who sent over a very nice patrol cop on his bike. (This was the first indication that they may not have been taking us to seriously). The cop took a look and pretty much came to the same conclusion that we did, that the bone looked too big to be human but WHY would there be a large bone buried in the pool steps? Since he also was unsure if it was human or not he called his Sargent, who showed up in his car (step up in seriousness) and took a look for himself. After he also determined the same thing everyone else had and took some pictures, he let us continue with our work but made us avoid the area with the bone in it. At this point we had half of the big wall down so we started work on getting the other half down. We made multiple attempts at getting a video of this, but much to our dismay, it did not work any of the times. We got the other half of the wall down before the Sargent came back and had us jack hammer the bone out of the steps. He took it with him for evidence and let us finish our work. At this point the pool looked like this.

After a few more hours with the jack hammer we had everything broken up that we needed to and we were able to return the jack hammer, compressor and the U-Haul truck we needed to rent since we needed to tow the compressor in time to go to our first PawSox game with Jon and Katie!


While Nate was hammering away, I worked on putting the floor down in the porch. I wanted something that looked like tile, but also something durable and could handle cold temperatures. This landed me on laminate tiles. These things are really cool. They look like stone tiles and they can even be grouted! To reinforce the floor, we first laid a new subfloor.

We used a subfloor with a coating to prevent mold and grossness from forming. To help the tiles stick to the subfloor we used an adhesive that we just rolled on.

Once this dried I was able to put the tiles down which consisted of taking off the paper and sticking them down on the floor (super easy). This is the floor before grouting


And this is it after I grouted


It will look better once the grout is completely dry and I can mop the floor. This week we are renting a large tractor and moving the rest of the cement into the pool and getting fill so the pool will officially be gone! We are also putting the deck on this weekend so the next week should be a big week for our backyard.

Sunday, August 1, 2010

Rolling, Rolling, Rolling. Keep Those Windows Rolling. Yee Ha!!

I would normally advise against rolling windows. However, when Home Depot doesn't deliver them, you've got to get them home somehow! Luckily, since our order was large enough, they did let us use the Home Depot truck for free (for a grand total of 75 min). Here's the break down of the time

0 min - 20 min: Move the truck in front of the loading area and wait...and wait some more... and finally call Nate, whose in the store, who informs me that he's walking back and forth between the Costumer service area and the loading area trying to let the loading guys know that the windows and door actually belong to us.

20 min -30 min: Wait outside with Nate for the fork lift guys to come to the loading area to load the door onto the truck since it's so big.

30 min- 45 min: Finally go inside to see what is taking so long. I take a look at the windows and door for the first time. Notice there are a bunch of marks on the door and scraps. Complain to the Manager. Fork lift guys show up but can't load the door yet since it's all banged up.

45 min - 55 min: Walk back down to Customer Service where they give us a small refund on the door since we can't wait another month for a new one. Meanwhile the loading guy we were working with went home and the fork lift guys left.

55 min - 60 min: Walk back down to loading area and regroup the team to load the truck.

60 min -75 min: Load truck. The only thing that made this a tolerable process was the fork lift guys comment once he got the door on the truck of "I think we need some rope". I found this hilarious although I'm pretty sure that I was the only one who did. I desperately ran back to the rental area to reset the time on the truck since we hadn't actually left the parking lot yet.


We needed A LOT of rope

0 min - 35 min: Drive painfully slowly back home in an effort to not to topple anything out the side of the truck. Home Depot is also on the opposite side of the raised train tracks from our house so we had to go through the one tunnel that we wouldn't crash into since we were over 11' tall with the door. (Luckily we thought of that BEFORE we got to the tunnel)

35 min - 50 min: Unload the truck as fast as we possible can. This was made more difficult by the fact that we also brought home 10 sheets of 4'x8', very heavy, sheathing.

50 min - 60 min: Drive to gas station and fill up the tank so we don't have to pay $6.50 a gallon from Home Depot.

60 min - 73 min: Drive to Home Depot.

73 min - 74 min: Hunt down the rental guys

74 min -75 min: Return truck and get jabs from the rental guy about cutting it close. 

Valuable lesson learned: When we buy lumber for our deck, 75 min will not be enough time to get it home and unload it.

OK. So at this point we had the windows and door home. Now we needed to prep the outside of the house to put them in. 

1st step: Sheathing. This step is basically creating a wall on the outside of the house. This is what you attach the siding to. Nate and I started Wednesday night and then as a surprise for Nate I finished it on Thursday while he was teaching. I should have set up a video camera for this because I could have won a ton of money from AFV. Heavy boards, saws and I apparently don't mix well but it did get done!


2nd Step: House wrap. This is the waterproofing of the house. It was surprising fast to put up and, minus a trip to Lowe's to get some more, only took about an hour.

Almost finished

 All waterproofed!

3rd Step: Install windows and door. This was a little tricky since they are secured from the outside and as you can see, there's not much to stand on outside the windows. This was solved by feeding the windows at an angle out and Nate "catching" them on a ladder while I held the top and then somehow pushing them into place. This worked well on everything but the door. We have doors that swing out and they kept trying to swing! It was a little touch and go on the door but we got it in.

All in!

Close up

Inside view: door

Inside view: Windows

We are now one step closer to finishing the back porch. Our plans for our deck also passed and we have the permit so hopefully soon we will be able to open the doors and step out onto a deck! (instead of a 6 foot drop).